 Published by Michael Becker
Last updated on April 15, 2026
•
7 minute read
If you've been following Microsoft's announcements, you probably already know that NTLM is on its way out. It's not a question of "if" anymore - it's "when." And as an IT admin who relies on WMI sensors for monitoring your Windows infrastructure, that's something you need to be prepared for.
Starting with PRTG release .118, you can use Kerberos authentication for all WMI sensors on the classic probe - made possible by a new WSMan protocol implementation. Let's break down what that actually means for you and your monitoring setup.
Ready for future-proof WMI monitoring today? Try PRTG for free and explore the new WSMan and Kerberos to support yourself.
👉 Download your free PRTG trial
NTLM vs. Kerberos - What's Actually Changing?
NTLM has been around for decades - and that's kind of the problem. It was designed for a different era of IT, and Microsoft has been slowly tightening the screws on it for years. The company has officially begun phasing out NTLM in favor of Kerberos, which is far more secure, especially in Active Directory environments.
For PRTG users, this created a real headache. WMI sensors - the backbone of Windows monitoring - have historically depended on NTLM authentication. Which means, as organizations started hardening their environments and restricting NTLM, monitoring started breaking. Not ideal.
Kerberos solves that. It's the modern standard, built on mutual authentication and ticket-based access - no more sending credentials across the network in the same way NTLM does.
One important note right from the start: Kerberos requires DNS names. If you're using plain IP addresses to connect to your monitored devices, Kerberos authentication will fail. Make sure your WMI targets are reachable via DNS before switching.
WSMan: The Key to Kerberos in PRTG
WSMan - short for Web Services-Management - is a standard protocol for managing systems remotely. You might know it as the transport layer behind WinRM. By enabling WSMan as the WMI transport protocol, PRTG can now use Kerberos for authentication. And this is where things get interesting from a security standpoint.
You have two authentication options to choose from:
- Only Kerberos - PRTG authenticates exclusively via Kerberos. If Kerberos isn't successful or available (for example, because you used an IP instead of a DNS name), the connection simply fails. No fallback, no compromise.
- Negotiate (Kerberos, Fallback to NTLM) - PRTG tries Kerberos first. If that doesn't work, it falls back to NTLM. Useful during transition periods where not every device is fully Kerberos-ready yet.
Both options are available in PRTG's Credentials for Windows Systems settings under WMI Authentication Method - but only once WSMan is enabled on the probe.
Test Your WSMan Connection with the PRTG WMI Tester
Before you flip the switch in PRTG, it's worth verifying that WSMan connections to your target systems actually work. That's where the PRTG WMI Tester comes in handy - a free tool from Paessler that lets you quickly check WMI connectivity without touching your live monitoring setup.
The WMI Tester supports both DCOM and WSMan, so you can test your WSMan setup independently. Just enter the domain, DNS name, and your credentials - then specify WSMan as the protocol and hit Test. The tool returns a result table with system information or an error message if something isn't configured right. That's often the fastest way to catch issues like missing DNS resolution or permission problems before they show up as sensor errors in PRTG.
How to Set It Up in PRTG
The setup is straightforward. Here's how to get WSMan up and running:
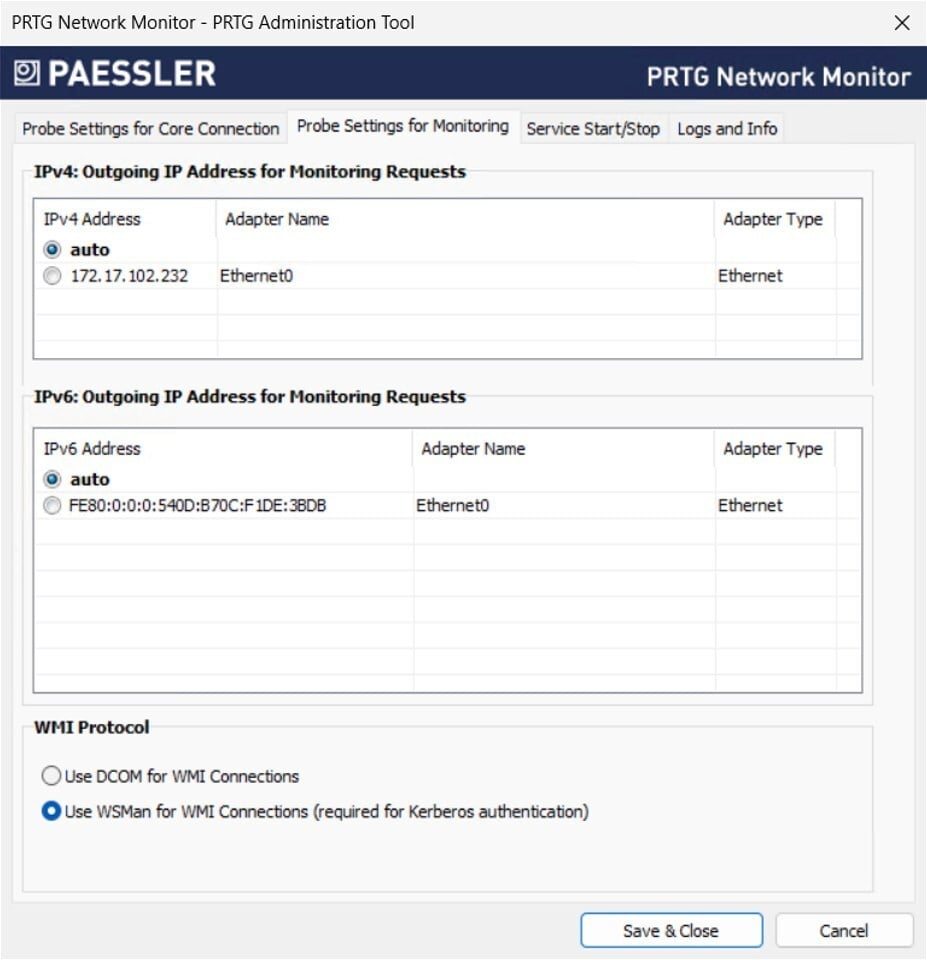
- Open the PRTG Administration Tool on your probe system.
- Navigate to Probe Settings for Monitoring - you'll see a new radio button: Use WSMan for WMI connections.
- Select it. Note that DCOM remains the default, so this is an opt-in step you take deliberately.

- Once WSMan is enabled on the probe, go to PRTG Settings > Credentials for Windows Systems.
- Under WMI Authentication Method, choose either Only Kerberos or Negotiate (Kerberos, Fallback to NTLM).
One thing worth highlighting: you can configure this per probe. That gives you a lot of flexibility - for example, you can enable WSMan on probes that cover your core Windows infrastructure while leaving DCOM active on probes where Kerberos isn't yet available.
The Performance Bonus You Didn't Expect
Here's something that might surprise you: switching to WSMan doesn't just improve security - it also significantly reduces the performance impact of WMI monitoring.
With DCOM, WMI queries can be resource-intensive on the probe system. WSMan is considerably more efficient, as most of the load reduction comes from an improved implementation on the probe side. In practice, this means you can run more WMI sensors per probe without running into performance bottlenecks. If you've ever had to split up your WMI-heavy probes because they were getting overloaded, this is worth paying attention to.
There's another angle here too: WSMan makes least privilege monitoring much more accessible. DCOM has historically required broader permissions to work reliably. WSMan's cleaner access model means you can tighten up your service account permissions without breaking your sensors. That's a win for your security posture on multiple levels.
What's Coming Next
Right now, WSMan is an opt-in feature. You have to actively enable it - nothing changes in your existing setup unless you want it to. That's a deliberate choice to give you time to test and adapt.
But heads up: this will change. We plan to make WSMan the default protocol for all new PRTG installations in the near future. So rather than scrambling to adapt when that happens, now is a great time to start testing WSMan in your environment, identify any DNS or permission issues, and get comfortable with the new setup before it becomes the standard.
The direction is clear. NTLM is going away, Kerberos is the future, and WSMan is how PRTG gets you there - with better security and better performance along the way.