.jpg) Published by Jasmin Kahriman
Published by Jasmin Kahriman
Last updated on December 17, 2025
•
15 minute read
Data is at the heart of any industry, and storing and maintaining it properly plays a crucial role for business operations. Data should be stored by following the 3-2-1 backup rule and using reliable storage devices.

One of the vendors that has proven to be reliable in the data storage sector is Synology. Synology Inc. is a Taiwanese company that has been producing Network Attached Storage (NAS) devices for over 20 years, serving companies of all sizes, from small businesses to large enterprises.
It is not enough just to configure a Synology NAS and store the data on it; you need to ensure that all hardware and software components are operating properly. Effective network monitoring helps you track critical metrics like CPU usage, bandwidth consumption, and network traffic in real time, allowing you to identify potential issues before they impact your operations.
What if you were to lose your data temporarily or permanently? What if you had the chance to prevent it through proactive monitoring? This is where a comprehensive network monitoring solution becomes essential.
PRTG has proven that any device can be monitored using various types of sensors, including Synology devices. As a powerful network monitoring tool, PRTG offers native integrations for Synology NAS systems through SNMP-based sensors. There are three sensors available to monitor the health status of logical disks, physical disks, and the overall system state.
I will show you what these sensors do and how to use them in three easy steps.
Why Monitor Your Synology NAS?
Before diving into the configuration steps, it's important to understand why monitoring your Synology NAS matters. Your NAS is a critical storage device that houses valuable business data, and monitoring provides several key benefits:
Proactive troubleshooting: Real-time monitoring allows you to detect disk failures, temperature spikes, or performance degradation before they cause downtime. Instead of reacting to problems after data loss occurs, you can address issues during maintenance windows.
Performance optimization: By tracking metrics like CPU load, memory usage, and network traffic, you can identify bottlenecks that slow down file transfers or backup operations. This visibility helps you optimize your storage infrastructure for better performance.
Capacity planning: Monitoring disk usage trends helps you predict when you'll need additional storage capacity, preventing unexpected "disk full" scenarios that can halt critical business operations.
Security and compliance: Continuous monitoring helps detect unusual activity patterns that might indicate security threats or unauthorized access attempts to your storage device.
Step 1: Enable SNMP on a Synology NAS
Since all three PRTG sensors are SNMP-based, it is essential to enable SNMP on your Synology NAS. SNMP (Simple Network Management Protocol) is the industry-standard protocol for network monitoring software, allowing monitoring tools to communicate with network devices and retrieve performance data.
Both PRTG and Synology support all three versions of SNMP: v1, v2c, and v3. For enhanced security, especially when monitoring devices over remote networks or VPN connections, SNMP v3 is recommended as it provides authentication and encryption capabilities.
To enable SNMP, log in to your Synology DiskStation Manager (DSM) and navigate to Control Panel > Terminal & SNMP > SNMP.
You can find detailed instructions on how to enable one of the three SNMP versions here.
Step 2: Add the Synology NAS to PRTG
Next, you need to add your Synology NAS to PRTG using its IP address or FQDN. Additionally, you must configure the SNMP settings in PRTG to match the SNMP settings on your Synology NAS. If these settings do not match, PRTG and Synology will not be able to communicate.
- Log in to PRTG.
- Add your Synology NAS as a new device and choose the Synology icon if you prefer.

Add Synology NAS to PRTG
- Scroll down to Credentials for SNMP Devices and toggle the icon. Match the SNMP settings to those configured on your Synology NAS. In my case, it is SNMP v2c with the community string set to synology and the SNMP port set to 161.
Once done, click OK.Your Synology device has been added to PRTG, and you can now start monitoring key metrics. This integration allows PRTG to collect performance data from your Synology DSM system and provide real-time visibility into your storage infrastructure.

Configure SNMP settings in PRTG
Your Synology device has been added to PRTG, and you can now start monitoring key metrics.
Step 3: Add sensors and start monitoring
In the third step, navigate to your Synology NAS in PRTG and add the three native sensors to monitor logical disks, physical disks, and overall system health.
SNMP Synology Logical Disk
1. Click on Add Sensor.

Add a sensor
2. Enter synology in the search field and select the first sensor: SNMP Synology Logical Disk. This sensor monitors the volume status of a Synology device.

Add SNMP Synology Logical Disk sensor
3. Select the logical disks you want to monitor and click Create.

Select one or more logical disks
4. For each selected disk, PRTG creates a sensor. After the first scan, the sensors will become active, as shown in my example.

The sensors have been created
If you navigate to the sensors, you will see the status of the logical disk. A Synology logical disk (volume) can be in one of the following states:
- OK (Normal, Parity Checking, Data Scrubbing, Deploying, Undeploying, Mounting Cache, Unmounting Cache, Expanding Unfinished SHR, Converting SHR to Pool, Migrating SHR1 to SHR2)
- Warning (Repairing, Migrating, Expanding, Creating, Syncing, Assembling)
- Error (Deleting, Canceling, Degrade, Crashed, Unknown).

Volume status of the logical disk
Monitoring logical disk status is crucial for preventing data loss. When a volume enters a "Warning" state during operations like expanding or migrating, you'll receive notifications allowing you to monitor the process. If a volume crashes or degrades, immediate alerts enable you to take corrective action before permanent data loss occurs.
SNMP Synology Physical Disk
5. Repeat steps 1 and 2 and add the SNMP Synology Physical Disk sensor.
6. Select one or more physical disks and click Create.
Select one or more physical disks
7. For each selected disk, PRTG will create a sensor. After the first scan, the sensors will become active, as shown below.
The sensors have been created
If you navigate to the sensors, you will see two metrics: temperature and disk status. A Synology physical disk status can be in one of the following states:
- OK (Normal, Initialized)
- Warning (Not Initialized)
- Error (System Partition failed, Crashed)

Overview of Synology physical disk sensor
Temperature monitoring is particularly important for preventing hardware failures. Hard drives operating above their optimal temperature range (typically 40-50°C) experience accelerated wear and higher failure rates. By monitoring disk temperature in real time, you can identify cooling issues or excessive workload before they damage your storage hardware.
SNMP Synology System Health
8. Repeat steps 1 and 2 and add the SNMP Synology System Health sensor.
9. Keep the default settings and click Create. 
Create SNMP Synology System Health sensor
10. PRTG will create a single sensor. After the first scan, the sensors will become active, as shown in my example.
The sensor has been created
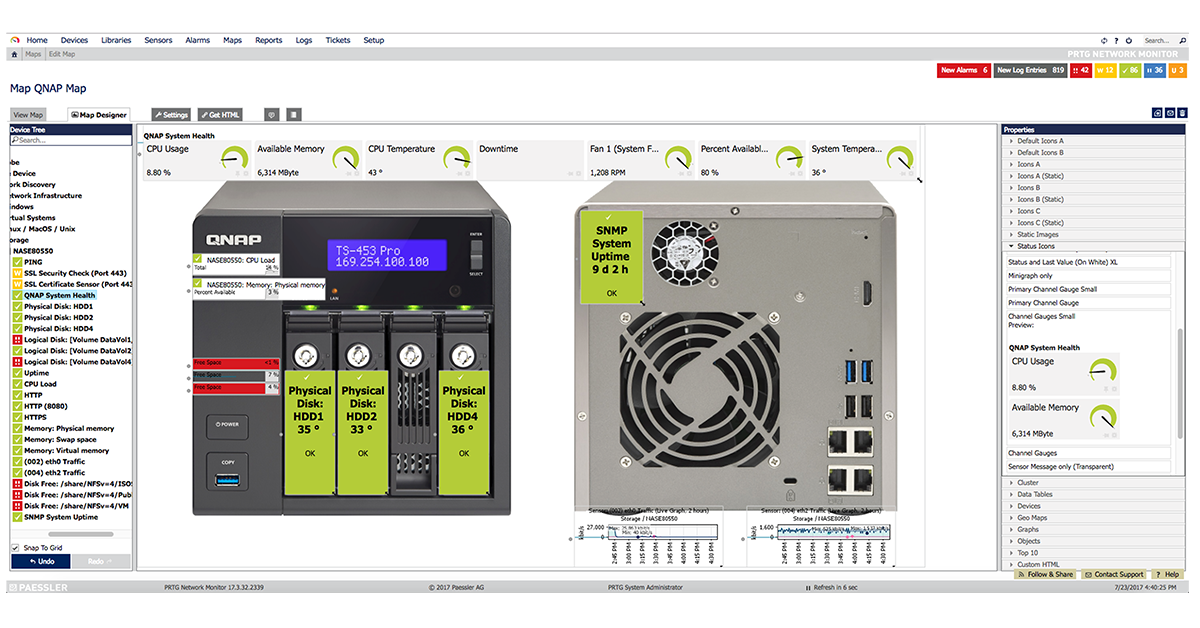
If you navigate to the sensor, you will see five metrics including CPU fan status, CPU load, memory free, system status, and temperature. The System Status channel has the following states:
- OK (Normal)
- Error (Failed)

Synology system health
The system health sensor provides a comprehensive overview of your Synology NAS performance. High CPU load might indicate resource-intensive processes like video transcoding, Docker container operations, or backup tasks competing for resources. Low memory availability can slow down file transfers and application performance, especially when running multiple packages from the Synology Package Center.
Understanding Notifications and Alerts
One of the key advantages of using PRTG for Synology network monitoring is the robust notification system. PRTG can send alerts via email, SMS, push notifications to mobile devices (both iOS and Android), or trigger custom scripts when sensors detect issues.
You can configure notifications to alert you when:
- Disk temperatures exceed safe thresholds
- Volume status changes to Warning or Error states
- CPU load remains high for extended periods
- Available disk space falls below defined limits
- Network bandwidth usage spikes unexpectedly
These automated notifications enable you to respond quickly to potential problems, often before users notice any performance degradation. For remote access scenarios, PRTG's mobile apps allow you to monitor your Synology NAS and acknowledge alerts from anywhere, ensuring you stay informed even when away from your desk.
Monitoring Network Traffic and Bandwidth
Beyond the three native Synology sensors, PRTG offers additional monitoring capabilities that are particularly valuable for understanding how your NAS interacts with your local network. Network traffic monitoring helps you identify bandwidth bottlenecks and optimize data transfer performance.
You can add SNMP Traffic sensors to monitor the network interfaces on your Synology NAS, tracking both inbound and outbound traffic. This visibility is essential for:
Identifying bandwidth hogs: Determine which applications or users are consuming the most network resources. For example, you might discover that automated backup jobs are saturating your network during business hours, impacting user productivity.
Optimizing backup windows: By analyzing bandwidth usage patterns, you can schedule resource-intensive operations like hyper backups or replication tasks during off-peak hours.
Troubleshooting performance issues: When users complain about slow file transfers, traffic monitoring helps you determine whether the bottleneck is network-related, storage-related, or caused by external factors.
Planning network upgrades: Historical bandwidth data helps you make informed decisions about when to upgrade from 1GbE to 10GbE network connections or implement link aggregation for improved throughput.
Advanced Monitoring Scenarios
Monitoring Synology Routers
If you're using a Synology router in addition to your NAS, PRTG can monitor both devices from a single interface. Synology routers support SNMP monitoring, allowing you to track router health, firewall activity, VPN connection status, and WiFi performance. This unified approach to monitoring your entire Synology ecosystem provides comprehensive visibility into your network infrastructure.
Docker Container Monitoring
Many Synology NAS users run applications in Docker containers through the Container Manager package. While the native Synology sensors monitor the underlying hardware, you can extend your monitoring to include container-specific metrics by using PRTG's HTTP sensors or custom scripts. This allows you to monitor the availability and performance of containerized applications like Domotz, LibreNMS, or other network monitoring tools running on your NAS.
Remote Network Monitoring
For organizations with multiple locations, PRTG's remote probe functionality enables centralized monitoring of distributed Synology NAS devices. You can deploy remote probes at each site to monitor local Synology devices, with all data aggregated in a central PRTG core server. This architecture is particularly useful for monitoring Synology NAS systems connected via VPN or across WAN links.
Integration with Synology DSM Features
PRTG's monitoring capabilities complement the built-in features of Synology DSM. While DSM provides basic resource monitoring through its Resource Monitor application, PRTG offers several advantages:
Historical data retention: PRTG stores monitoring data long-term, allowing you to analyze trends over weeks, months, or years. This historical perspective is invaluable for capacity planning and identifying gradual performance degradation.
Centralized monitoring: If you manage multiple Synology NAS devices or a mixed environment with other storage systems, PRTG provides a single pane of glass for monitoring all devices, eliminating the need to log into each DSM interface separately.
Advanced alerting: PRTG's notification system is more flexible than DSM's built-in alerts, supporting complex escalation chains, acknowledgment workflows, and integration with ticketing systems.
Automation capabilities: PRTG can trigger automated responses to specific conditions, such as running cleanup scripts when disk space runs low or restarting services when they become unresponsive.
Pricing and Licensing Considerations
PRTG offers flexible pricing based on the number of sensors you need. For monitoring a single Synology NAS with the three native sensors plus a few additional sensors for network traffic and availability, the PRTG 500 license (supporting up to 500 sensors) is typically sufficient for small to medium deployments.
A free trial is available, allowing you to test all functionality before committing to a license. This trial period is an excellent opportunity to evaluate whether PRTG meets your Synology monitoring requirements and to familiarize yourself with the sensor configuration process.
Other sensors
We covered three native Synology sensor types; however, there are additional sensors available to monitor metrics such as availability, uptime, utilization, OS upgrade status, HTTP, SSL, SSH, and more.
For example, you can use:
- Ping sensors to monitor network connectivity and latency to your Synology NAS
- HTTP sensors to verify that DSM web interface and other web-based services are accessible
- SNMP Disk Free sensors for more detailed disk usage monitoring
- Custom sensors to monitor specific Synology packages or applications
Conclusion
Monitoring your Synology NAS with PRTG provides comprehensive visibility into your storage infrastructure, enabling proactive troubleshooting, performance optimization, and capacity planning. The combination of SNMP-based sensors for hardware health, network traffic monitoring for bandwidth analysis, and flexible alerting ensures you can maintain optimal NAS performance while preventing data loss.
By implementing the monitoring solution described in this guide, you'll gain real-time insights into disk status, system health, temperature, CPU load, and network utilization—all critical metrics for maintaining a reliable storage environment. Whether you're managing a single Synology NAS in a small office or multiple devices across distributed locations, PRTG's scalable architecture and extensive sensor library provide the monitoring capabilities you need.
Ready to start monitoring your Synology NAS? Learn more about PRTG's Synology monitoring capabilities and download a free trial to experience the benefits of comprehensive network monitoring firsthand.