 Published by Michael Becker
Last updated on October 22, 2025
•
8 minute read
You've got Cisco Meraki devices humming along in the cloud, but here's the thing - you probably want to monitor them alongside everything else in your network. That's where PRTG Network Monitor and its dedicated Cisco Meraki sensors come in handy. They grab data straight from the Meraki cloud API, so you don't have to mess around with SNMP sensors configuration or worry about SNMP v3 authentication complexity.
Paessler PRTG Network Monitor includes two native sensors for monitoring Cisco Meraki devices - the Cisco Meraki Network Health sensor and the Cisco Meraki License sensor which I introduced in this article:
👉 Let's talk about sensors! Monitoring Cisco Meraki with PRTG sensors
These sensors have moved out of beta status and are now fully supported in PRTG Network Monitor. They provide comprehensive monitoring capabilities with all the reliability you'd expect from production sensors.
ℹ️ Important: Unlike beta sensors that require experimental features to be enabled, these Cisco Meraki sensors are now available in the standard sensor library and ready for production use.
What is Cisco Meraki?
Cisco Meraki is a fully cloud-managed network solution. WLAN, switching, security, WAN optimization and MDM are managed centrally via the Internet through the Meraki cloud platform. As the industry leader, the entire Cisco Meraki product portfolio can be managed entirely in the cloud - from access points and switches to security appliances and endpoint management.
The Meraki cloud dashboard handles device management pretty well, but if you're already running PRTG Network Monitor for the rest of your infrastructure, you probably want everything in one place. You get Meraki cloud's slick management plus PRTG Network Monitor's comprehensive monitoring without having to switch between tools all day.
How to add the Cisco Meraki Network Health sensor
Requirements
PRTG Configuration:
- A current PRTG Network Monitor version that supports the latest PRTG sensors
- No special configuration required - these sensors are now part of the standard sensor library
Cisco Meraki Configuration:
- Administrator account with appropriate permissions to your Meraki cloud organization
- API access enabled for your organization (if API access is disabled, you must enable it manually. For more information, see Cisco Meraki Dashboard API: Enable API Access)
- API key generated from your administrator account
Add the sensor in PRTG
The Cisco Meraki Network Health sensor connects directly to your Meraki cloud infrastructure through the API. This is how you add it to PRTG:
- Navigate to your device in the PRTG Network Monitor web interface where you want to add the sensor
- Click "Add Sensor" and search for "Cisco Meraki"
- Choose the "Cisco Meraki Network Health sensor"
- Select your network and configure scanning intervals (recommended: 5 minutes)
- Click "Create" to finalize the sensor setup
If everything is configured correctly, the sensor appears after a few seconds and provides comprehensive device status monitoring with very low performance impact:
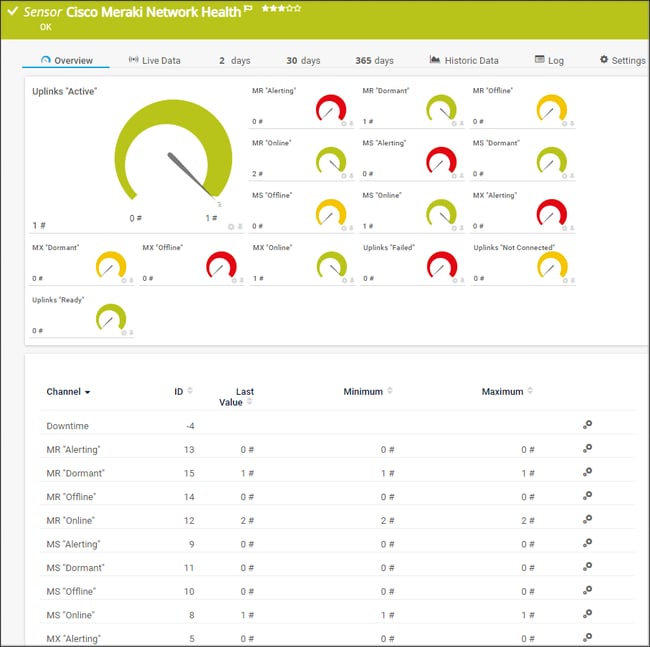 Through the channels of the sensor you get information about these device types:
- IoT devices: Status monitoring
- Meraki Radios (MR): Wireless access point status
- Meraki Switching (MS): Network switch status
- Meraki Security (MX): Security appliance status
- Uplinks: Connectivity status
The sensor supports IPv6 and can be deployed on multi-platform probes, making it suitable for distributed monitoring environments. This beats the old-school approach of configuring individual SNMP sensors for each device type.
Have a look here for all details about the channel list:
👉 Cisco Meraki Network Health channel table
How to add the Cisco Meraki License sensor
License monitoring might not be the most exciting part of network management, but it'll save you from some nasty surprises when licenses expire and devices stop working. The Cisco Meraki License sensor provides essential licensing visibility for your Meraki cloud infrastructure.
Setup Process:
You add the Cisco Meraki License sensor similar to the Network Health sensor described above. The same requirements must be met for this sensor as well. The License sensor has a recommended scanning interval of 6 hours, which is appropriate for license monitoring that doesn't require frequent updates.
The License sensor appears within seconds and provides critical licensing information from your Meraki cloud:
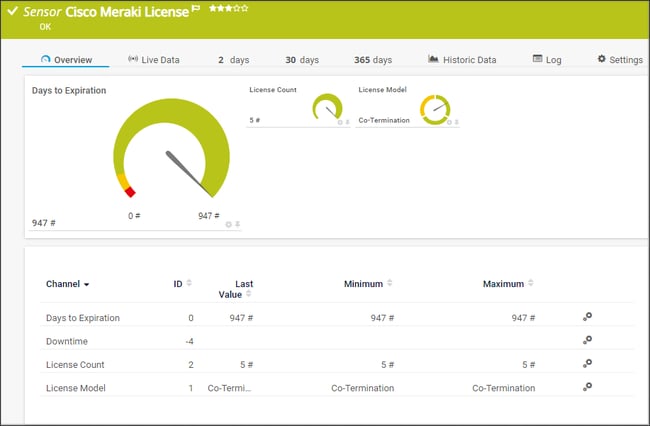
License Monitoring Channels:
- Days to expiration (primary channel): Countdown with predefined limits: 90-day warning, 30-day error
- License count: Current license usage across your organization
- License model: License types (Co-Termination, Per-Device, Unknown)
The sensor includes predefined limits for key metrics and supports IPv6 connectivity. Set up alerts on the "Days to expiration" channel and you'll never get caught off-guard by an expired license again.
You can find a detailed description of the channels here:
👉 Cisco Meraki License Sensor channel table
Future PRTG Developments
If you're interested in what we're working on or will work on in the future, have a look here:
On our roadmap, we also collect feedback via surveys to help us develop new features, and we would love to get your opinions. The Cisco Meraki sensors continue to evolve based on user feedback and Meraki cloud API enhancements.
What's coming for Cisco Meraki monitoring:
Cisco Meraki sensors continue to evolve based on user feedback and Meraki cloud API enhancements. For the latest information on upcoming PRTG features and improvements, check our product roadmap."
Getting Started with Meraki Cloud Monitoring
Dedicated PRTG Network Monitor sensors make it easy to keep an eye on your Meraki cloud infrastructure without leaving your main monitoring dashboard. The Network Health sensor gives you operational visibility with very low performance impact, while the License sensor keeps you compliant with predefined limits for key metrics. Both work through simple API connections instead of complex SNMP sensors setup.
If you're already using PRTG Network Monitor for the rest of your network, adding Meraki monitoring is a no-brainer. Everything shows up in the same interface, uses the same alerting system, and gets the same historical analysis.
Do you feel intrigued and want to start monitoring your Cisco Meraki infrastructure? Download PRTG Network Monitor, try our 30-day trial for yourself and see how easily it handles your Meraki cloud monitoring alongside everything else.