.jpg) Published by Jasmin Kahriman
Published by Jasmin Kahriman
Last updated on March 03, 2022
•
9 minute read
Our goal at Paessler is to provide you with a straightforward installation process. All you need is to download and run the latest PRTG installer (309 MB) from our website, add your email address and license information and enjoy your coffee while PRTG gets to work. PRTG will run an initial auto-discovery (if enabled) as soon as the installation of PRTG is finished. It will automatically add devices that are able to respond to ICMP in your network as well as suitable sensors for monitoring.

But sometimes IT Admins don’t want to perform initial auto-discovery. They want to install PRTG, create groups and devices manually and structure the device tree based on their needs. One of the recommended approaches is to create auto-discovery groups and add only devices that are part of the specific network segment. For example, you can create an auto-discovery group named “CCTV IP surveillance” and scan the network IP range where cameras are located, e.g. 172.16.10.100 – 172.16.10.200. The best practice is the one that best fits IT Admin´s needs.
In this post, I´ll show you how to skip auto-discovery via GUI but also how to apply command line parameters and manage your installation process in a different way than you might be accustomed to.
Please note: This article is provided for your information only and we do not officially support the silent installation of PRTG. At the time of this article, the information provided was valid. However, changes in the installer software or in PRTG may cause (some) options to not work as expected.
Install PRTG without auto-discovery
When you start the PRTG installer, you can select if you want to skip auto-discovery or not. Please have a look here for detailed instructions.
 Skip auto-discovery
Installation of PRTG without auto-discovery will require applying some command line parameters to the installer via PowerShell or Command Prompt. You will need to use an installer file, either the one you already have (start from step 2), or a new one you download from our website. Please follow the procedure below.
- Download the latest installer from the website
- Open File Explorer and navigate to the location where you stored the installer
- Click File > Open Windows PowerShell > Open Windows PowerShell as administrator. This is my preferred way to access a file's location via PowerShell, but you can do it differently.
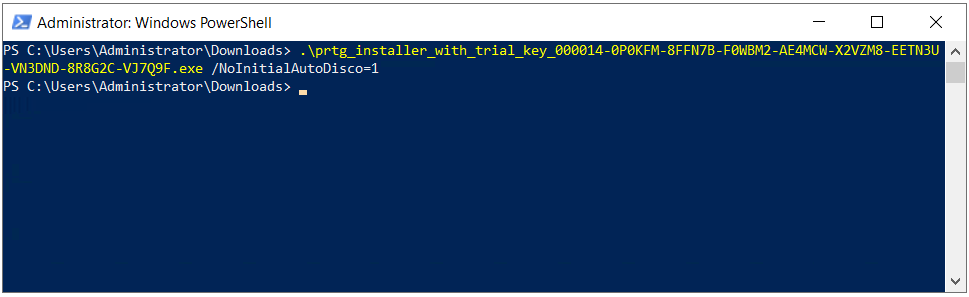
- Call the installer file. You can do it by typing the first letters of the installer name and then pressing Tab
- Add the command /NoInitialAutoDisco=1 to skip initial auto-discovery and press Enter. In my case, the license key is also part of the name, which is common for the trial version you download from our website. It also means the PRTG installer will inject this license during the installation, and you don’t need to do it manually. In case your installer name doesn’t include the license key, you will need to add your license name and key manually. In both cases, you will need to add an email address.
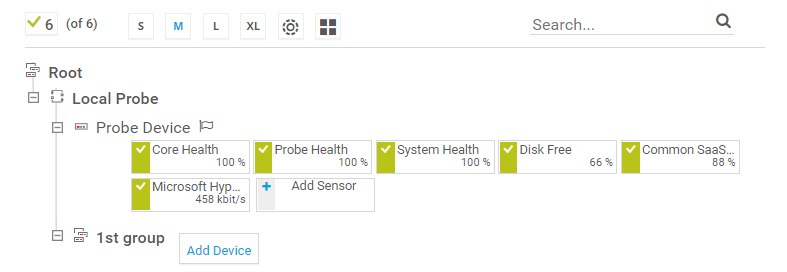
By default, PRTG will create a group called “1st group” without any sub-groups or devices (no auto-discovery). It is up to the IT Admin to create groups or auto-discovery groups.
Silent PRTG installation
In the first example, you install PRTG via a GUI. In this case, we will execute a set of commands and perform a very silent installation. During the installation, the wizard, background windows and the installation progress window are not displayed. You can track the status in the Task Manager by checking the process called Setup. The installer will also generate an output file with exit codes, which can help you to understand if the installation was successful or not. The procedure is described below.
- Navigate to the location where you stored PRTG installer and open PowerShell as administrator
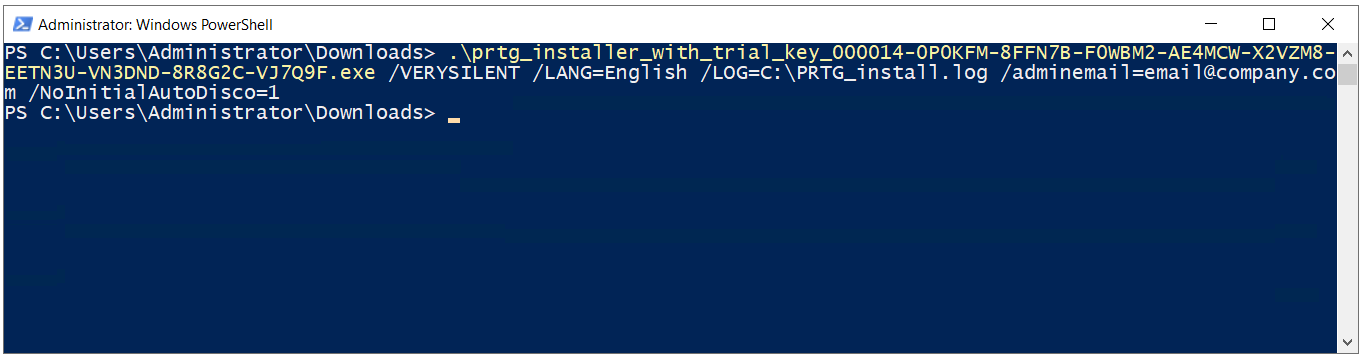
- Type the following command and press Enter
.\<PRTG installer name> /VERYSILENT /LANG=English /LOG=C:\PRTG_install.log /adminemail=<email@company.com> /NoInitialAutoDisco=1
 If the license key is not part of the installer name, you will need to add <licensekey> and <licencekeyname> into the command. The full command would be:
.\<PRTG installer name> /VERYSILENT /LANG=English /LOG=C:\PRTG_install.log /adminemail=<email@company.com> /licensekey= 000014-0P0KFM-8FFN7B-F0WBM2-AE4MCW-X2VZM8-EETN3U-VN3DND-8R8G2C-VJ7Q9F /licensekeyname=prtgtrial /NoInitialAutoDisco=1
where:
| Command Line Parameter | Description |
| .\<PRTG installer name> | Name of the installer |
| /VERYSILENT | Switch to very silent installation. It instructs setup to be very silent. The wizard, the background window, and the installation progress window are not displayed. We can also use /SILENT. In this case, the wizard and the background window are not displayed, but the installation progress window is. |
| /LANG=English | Choose installation language. You can install PRTG in different languages (English, Deutsch, Espanol, Francais, Japanese, Chinese, Dutch and Brazilian) |
| /LOG=C:\PRTG_install.log | Output log file. You can specify another location or file name |
| /adminemail= | Define email address |
| /licensekey= | License key |
| /licensekeyname= | License key name (e.g. trial) |
| /NoInitialAutoDisco=1 | Skip auto-discovery |
Setup exit codes
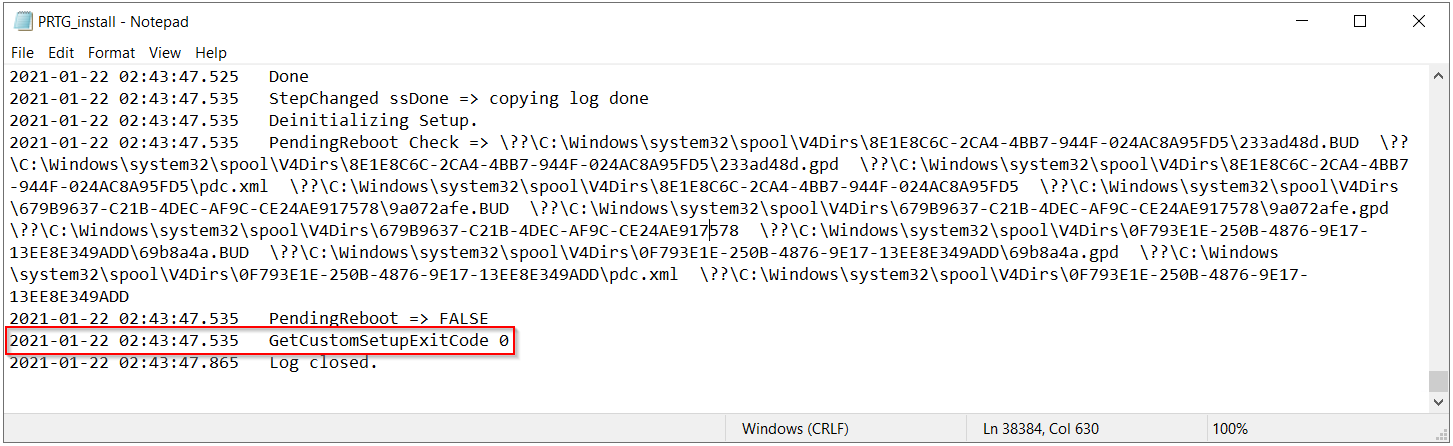
PRTG setup may return exit codes, which will help you to know the status of the installation. In my case, the installation was successful, which is confirmed with code 0.
The list and meaning of other codes are listed in the table below.
| Code | Description |
| 0 | Setup was successfully run to completion. |
| 1 | Setup failed to initialize. |
| 2 | The user clicked Cancel in the wizard before the actual installation started, or chose "No" on the "This will install..." message box. |
| 3 | A fatal error occurred while preparing to move to the next installation phase (for example, from displaying the pre-installation wizard pages to the actual installation process). This should never happen except under the most unusual of circumstances, such as running out of memory or Windows resources. |
| 4 | A fatal error occurred during the actual installation process. Note: Errors that cause an Abort-Retry-Ignore box to be displayed are not fatal errors. If the user chooses to Abort at such a message box, exit code 5 will be returned. |
| 5 | The user clicked Cancel during the actual installation process or chose Abort at an Abort-Retry-Ignore box. |
| 6 | The Setup process was forcefully terminated by the debugger (Run|Terminate was used in the IDE). |
Have you ever tried to use these command line parameters? Do you consider them useful?