 Published by Paessler Editorial Team
Last updated on March 03, 2022
•
11 minute read
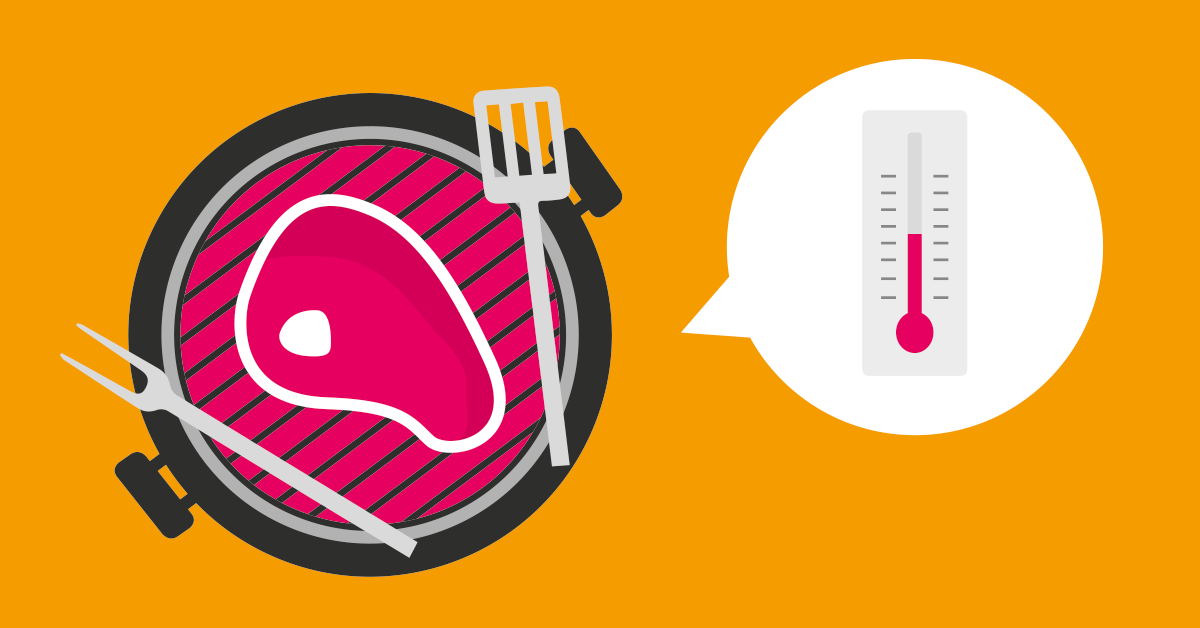
Since PRTG is running at my house 24/7, the question is 'what else can be included in the monitoring system in addition to my IT equipment (Fritzbox, different routers, switches)’. No summer is complete without a decent BBQ, and, for that ‘proper’ grilling experience, I use my 57” Weber Kettle and, of course, a water smoker for the so-called “long jobs” (ribs, pulled pork, etc.). In my case, a Smokey Mountain 57” from Weber.

The principle structure of a water smoker and the special functions are described in detail in the following.


In addition to many other factors, temperature plays a vital role in the “long job”. “Low and slow” means a desired temperature of between 105°C - 120°C that is as constant as possible over a period of at least 6 hours and up to 18 hours. This is a useful guide to get started.

Temperature Display
There is a cover thermometer and external probes to monitor the temperature. External probes are clearly preferred, because then you are not so dependent on the location of the smoker – plus, who wants to sit next to a smoker for 6 hours? In addition to my Maverik, I like to use the iGrill2 with app integration for the iPhone.

Advantage
The crucial advantage is that you can conveniently take care of other things while keeping an eye on your BBQ at all times.
Disadvantage
Even though you already use PRTG, you need another app for the BBQ. Furthermore, it would be significantly more convenient if PRTG would warn you through a push notification as soon as the temperature surpasses or drops below the desired temperature range. The illustration in graphs, as well as on a dashboard, from the comfort of your own living room, is a clear advantage of the app. Another disadvantage is the Bluetooth communication, which means the range is very limited. With high-power local WI-FI coverage of the entire garden, Wi-Fi communication is clearly the better choice. This is especially true if you can also access your PRTG server through a DNS service provider when outside of the domain and, let’s say, you have to step away quickly to get some ingredients that you may have forgotten for the BBQ. In this case, you would have all required temperatures in view at all times through the PRTG app.
What Should The Result Look Like Or What Is Actually The Goal Of Monitoring Regarding BBQs?
The following images should provide the necessary incentive to develop hardware for this and to answer the question as to why a perfect result requires such monitoring.


Hardware
The expenses/benefits/costs must be compared to each other. An SNMP thermometer with WI-FI and 2 probes costs approximately 167 EUR. Thus, the first decision must be made: “ready to use” hardware; or DIY and IoT. After careful deliberation, I opted for the IoT method, which is less expensive, but also more complex (and therefore more exciting). Another major step was finding the right hardware. First, the right platform had to be defined.
Raspberry PI

Arduino UNO

ledunia

Thanks to the support from my colleague Christian Zeh, I very quickly opted for Iedunia. Reasons: Costs, construction → integration in outdoor-proof casing (IP55/65), integrated WI-FI. The temperature sensors, also known as thermocouples, play a significant role as well. More research was required here to find the right hardware. Requirement: Temperature range of at least 200°C, K-type preferred.
Basics on Thermocouples
A thermocouple is a sensor to measure temperatures. Due to its low costs, wide temperature ranges, high temperature limits and availability in many different shapes and sizes, thermocouples are found throughout many industries and fields of science.
How Does a Thermocouple Work?
The Estonian-German physician Thomas Johann Seebeck discovered in the 1820s that a voltage difference is generated as soon as there is a temperature difference between two different electric conductors. The effect is known as the “Seebeck effect” or “thermoelectric effect”. The Seebeck effect forms the basis for the behavior of thermocouples.
In order to measure electric voltage at the two conductor ends, the return conductor must be made of a different type of material than the feed conductor – as illustrated in the schematic measurement setup below. If both conductors have the same material, there would be equally high differences in potential that would offset each other in a closed circuit. The connection point of a thermocouple exposed to the temperature to be measured begins to function as a measuring point; the transition to the (copper) wires leading to the voltmeter has the function of a reference junction. Any additional temperature-related difference in potential along the lines falls out of the voltage measurement with the same lines. Any thermoelectric voltage stands for a temperature difference between the measurement and reference junction. The temperature of the reference junction must be known to determine the actual temperature of the measurement junction (see the following). This temperature must also be known, because depending on the reference junction temperature, there is another temperature difference for each thermoelectric voltage because of the non-linear connection.

Theoretically, this voltage measurement only depends on the temperature difference (T1 - T2). With a change in T1, the outgoing voltage of the thermocouple changes proportionately to the temperature change, but not in a linear fashion. The outgoing voltage is in the range of approximately -10 mV to 77 mV (depending on the type of thermocouple and the measured temperature).
Thermocouple Types
Thermocouple elements are made of different metal combinations. These combinations are identified as thermocouple types. The most widely distributed is thermocouple type K as well as thermocouple types J, T, E and N, which are made of common metals. Furthermore, there are also thermocouple types for particularly high temperatures usually made of precious metals. These are the types R, S, B, C and G.
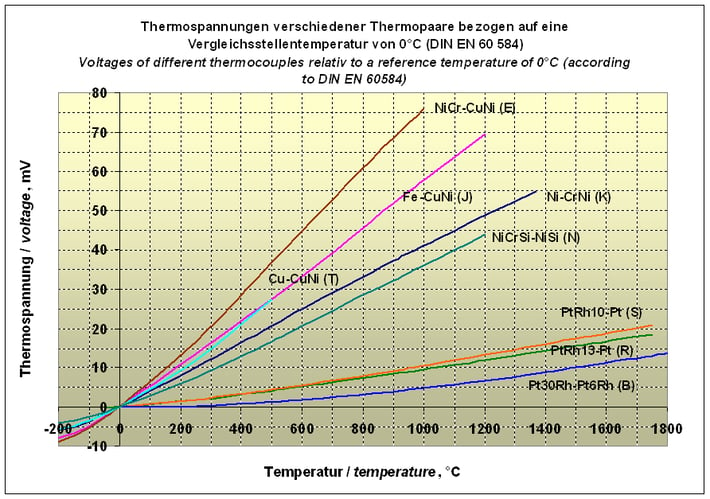
The decision here was made for ambient temperature measurement (see sketch: “principle structure of a water smoker”): Thermocouple type K (glass sleeves, insulated stainless steel point) from the manufacturer Adafruit, manufacturer article number:3245.

The most affordable thermocouples have a vinyl cover, which can melt at about 200 °C. With this thermocouple, a fiber glass sleeve is used so that it can be used for high-temperature measurements (for example, heating devices and ovens). There is a small piece of heat shrinkable tubing at one end of the wires to protect the fiber glass from fraying and a 2 cm long stainless-steel sensor on the other end.
- K-type thermocouple with fiber glass sleeve
- Works at temperatures up to 500°C (900°F)!
- Color-coded wires
- 1 meter long
- Works best with a thermocouple amplifier such as the MAX31855,AD8495 or MAX31856
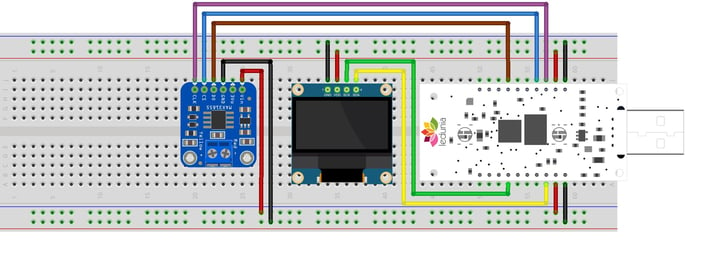
Adafruit thermocouple amplifier MAX31855 breakout board (MAX6675 upgrade) - v2.0, Breadboard, different cables
This should be enough for a test run as a “proof of concept”: First layout in order to examine the basic function.

A 128x64 OLED display was added to offer local illustration.

We use a RESTCustom BETA Sensor to illustrate the data from the microcontroller in PRTG. This sensor now queries the temperature data from the microcontroller within the selected query intervals and displays it accordingly in the sensor overview. The option to set limits and therefore trigger an alarm is very practical, provided that temperature values are exceeded or not met. The option to see the temperatures in the smoker through a mobile device at any time with the PRTG app is also very nice.


Conclusion
Anybody who is already using PRTG can expand the scope of use for PRTG with the possibility of displaying IoT devices. Ambient monitoring does not just have to include server rooms, but rather may also be used for evening BBQs.
Here is the source code for the project including a graphic output via mini OLED display (i2c).
About The Author
Christian Gügel has worked as a Senior System Engineer in Regional Presales at Paessler AG since January 2017 and is responsible for the DACH region, as well as the Netherlands. In addition to home automation, he is also interested in BBQs during his free time – the two of which can be perfectly combined with each other in this project.