 Published by Simon Bell
Last updated on March 14, 2023
•
10 minute read
We’ve already written a couple of articles about air quality monitoring and fine dust pollution. In this piece, I’m going to build on that information and explain how, with inexpensive, off-the-shelf* components you can use Paessler PRTG to monitor your atmospheric conditions and be alerted to potentially harmful levels of common pollutants.

For this build, we’ll be using a Raspberry Pi Zero 2 W and a Pimoroni Enviro+ board with the optional particulate matter sensor. The provided links are for the OEM sites, but the hardware should be available from almost any webstore catering to the “Maker Community”.
*I said "off-the-shelf" components, but unfortunately, it's not as simple as that due to the global chip shortages. Like a lot of hardware at the moment, Raspberry Pis are difficult to find and they're overpriced – so keep that in mind if you don't already have one.
Getting Everything Ready
In this project, we’ll be using the Pi in “headless” mode (no keyboard or screen), so there’s no need to install the full desktop version of Raspberry Pi OS. Instead flash your MicroSD card with the “OS Lite” version. You can do that using Raspberry Pi Imager or download the OS image from here and flash it using your favorite tool.
Before booting the Pi with the new image, you need to configure it to enable SSH at boot-up and configure your WiFi settings. Enabling SSH is easy: you simply need to create an empty file called ssh (with no file extension) in the root of the “boot” partition. Windows users can do this from the command line by changing directory to the boot partition and entering the command:
Preconfiguring the wireless connection is done in a similar way. Again, in the root of the “boot” partition, using a text editor, create a file called wpa_supplicant.conf and paste the following text into it:
You should change the country code to match your ISO 3166 alpha-2 country code, and the NETWORK-NAME and NETWORK-PASSWORD to match your own network settings.
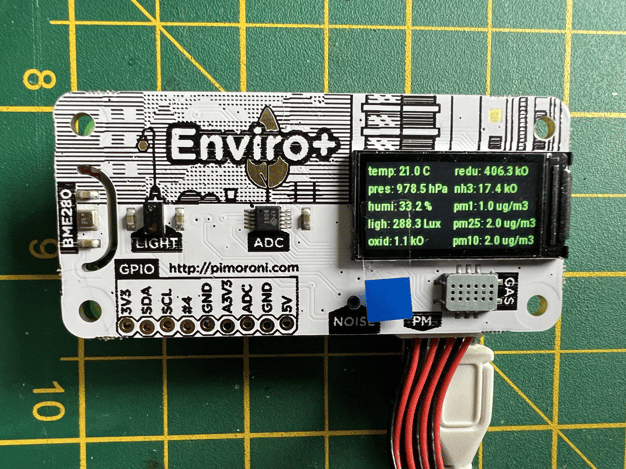
Connect the particulate matter sensor to the Enviro+ board – it’s easier to do this before attaching the board to the Pi. Then plug the Enviro+ board to the GPIO header on the Pi, making sure all the pins and sockets are aligned and no pins are bent.
Insert the SD card and power up the Pi. After a minute or so, the DHCP server on your router should show a new connection and IP assignment for the Pi. Use the router config screen to assign an IP address reservation, so that Pi retains the same IP whenever it restarts. Make a note of the IP being used.
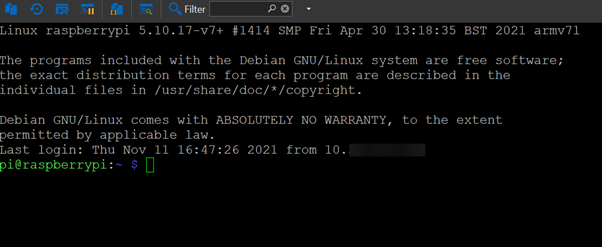
You should now be able to connect to the Pi using your preferred SSH client using the default credentials (which you should change!):
Username: pi
Password: raspberry
Pimoroni, the manufacturer of the Enviro+ board have an extensive library of documentation, code and usage examples on their GitHub site. This includes a handy, one line install script that downloads and configures all the software needed to get the board running and configures the I2C and SPI interfaces needed. Simply run the following command in your SSH session:
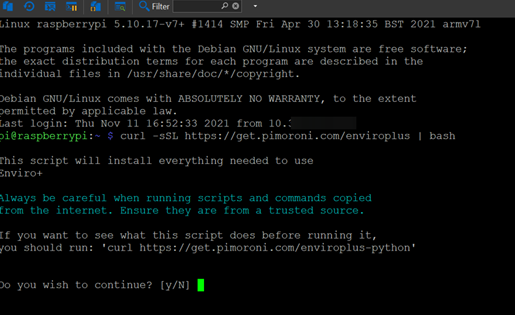
The script will install all the required software and then ask if you want to install the example Python scripts; reply “y” to this question. Once all the downloads are completed, the script will ask if you want to reboot to activate the updates; again reply “y”.
It’s Alive! (hopefully)
After the reboot, your new Enviro+ sensor is all ready to go. Login again and navigate to the ~/Pimoroni/enviroplus/examples folder and try running some of the example Python scripts, by running the following command:
For example, running, “python3 combined.py” should return values from all the Enviro+ sensors to the command line:
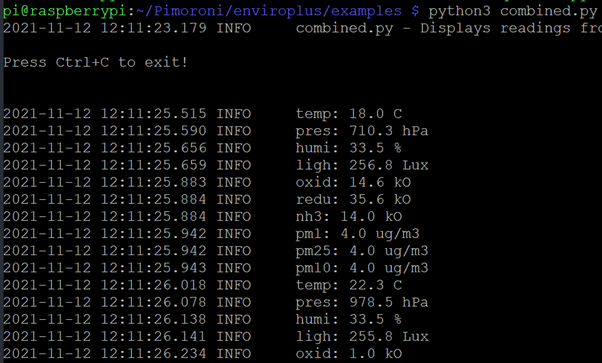
They’re also displayed on the built in LCD panel – cool eh? For extra coolness, put your finger over the light sensor, to cycle through the various display modes on the LCD.
So Where Does PRTG Fit In?
Displaying values at the console and on the board is nice, but of no use at all to PRTG. Instead, we need to get the sensor values in a format that PRTG can read. Fortunately, there’s another example file that does just that.
The mqtt-all.py script again collects all of the available sensor values, but this time it sends them to an MQTT broker running on the network. I’m running Mosquitto on one of my Synology NAS devices, so I’ll be using that as my broker. If you don’t already have one on your network, you could run a broker on the Raspberry Pi itself, but as the Pi Zero only comes with 512MB of memory, you might run into performance problems. A version 3 or 4 Pi might be a better option if you need to run an MQTT broker. All the provided instructions should work the same, regardless of the Pi version you use.
Run the mqtt-all.py script using the following command:
Where:
aaa.aaa.aaa.aaa – IP address of the MQTT broker
bbbbbb – name of the subscription topic (choose something obvious, like “enviro”)
You can also use the optional --username and --password switches for added security
For example:
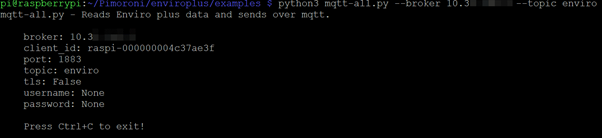
The sensor data should now be available to PRTG, via an MQTT Subscribe Custom sensor.
Because we’re reading the data from the MQTT Broker, not the Pi (unless your broker is running on the Pi), the PRTG sensor needs to be assigned to the device running the broker. So, add a new device in PRTG for the Broker and add an MQTT Subscribe Custom Sensor to it.
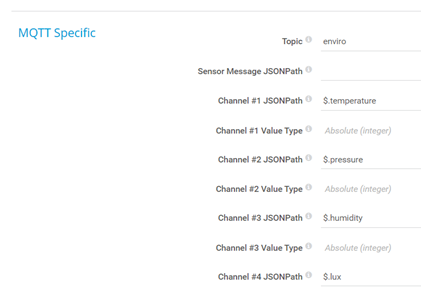
Then simply specify the topic name (e.g. enviro) and provide the JSONPath for each of the returned values. Once the channels are created, you can also “prettify” the Channel Labels.
| Value | JSONPath | Channel Label |
| Temperature | $.temperature | Temperature (°C) |
| Pressure | $.pressure | Pressure (hPa) |
| Humidity | $.humidity | Humidity (%) |
| Light Level | $.lux | Lux |
| Carbon Monoxide | $.oxidised | Carbon Monoxide (CO) (ppm) |
| Nitrogen Dioxide | $.reduced | Nitrogen Dioxide (NO2) (ppm) |
| Ammonia | $.nh3 | Ammonia (NH3) (ppm) |
| Particle Matter <1 micron | $.pm1 | Particle Matter (<1 micron) |
| Particle Matter <2.5 micron | $.pm25 | Particle Matter (<2.5 micron) |
| Particle Matter <10 micron | $.pm10 | Particle Matter (<10 micron) |
Like this:
This should result in a fully populated sensor:
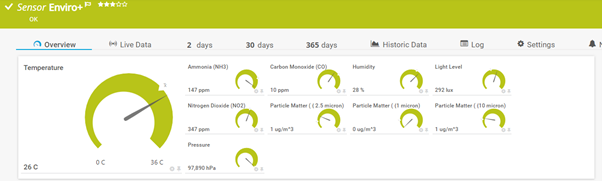
From there, you can assign limits (thresholds) to the individual channels and get PRTG to create alerts if those values are exceeded.
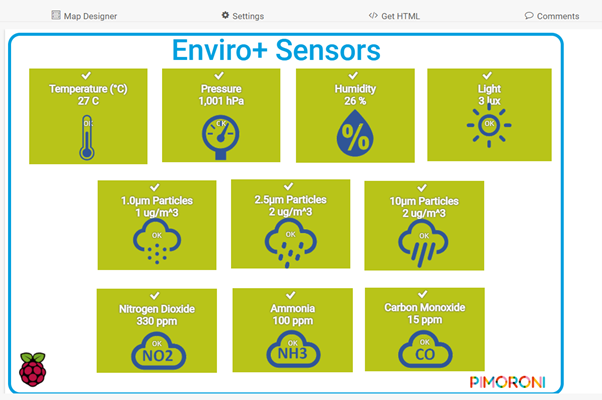
You can also create a map (dashboard) to display the sensor values and their status. For more flexibility, you can “breakout” the individual channels using a Sensor Factory sensor, allowing you to position individual channels on the map:
The last thing needed is configure the Pi to run the Python script every time it boots. There are several ways to do this, depending on your requirements and personal preferences. This page lists five of them.
Project Improvements
A couple of ideas for improving the project – the sample MQTT script doesn’t show the sensor values on the LCD screen. Why not add in the display code from the “combined.py” script so that the values are shown on the screen and sent to the MQTT broker? Also, the bare board and particulate sensor are kind of untidy. A custom 3d printed case would be a nice solution. You could design your own, or simply download one of the existing designs from Thingiverse – Check the requirements for these designs. Some require additional hardware such as ribbon cables to separate the Enviro+ board from the Pi.
I would love to hear your thoughts, ideas and comments if you try this out – write them below!