 Published by Simon Bell
Last updated on January 23, 2024
•
6 minute read
If you’ve been following our Maker Monday YouTube channel, (you HAVE subscribed, haven’t you?) you’ll have seen us describe how to integrate the Sonoff S20 smart socket with Home Assistant software. Here, we describe how you can use the procedure described in the video, to build a smart energy meter that works with PRTG.

As well as the S20 socket, iTead produce several other Sonoff branded smart home devices, many of which can be updated with custom firmware that allows them to easily integrate with different software platforms, including PRTG. One such device is the Sonoff Pow R2 smart switch, a WiFi enabled switch with energy usage sensors built in. Out-of-the-box, the Pow R2 only works with Sonoff’s own EWeLink app. But, like the S20, the Pow R2 can be flashed with Tasmota custom firmware that adds HTTP and MQTT capabilities to many Sonoff devices.
Note - Sonoff devices are mains-powered (grid-powered for any American readers) and therefore potentially dangerous. Before attempting this project, please read and understand the instructions and safety guidelines on the Tasmota project pages:
- https://github.com/arendst/Sonoff-Tasmota
- https://github.com/arendst/Sonoff-Tasmota/wiki/Hardware-Preparation
- https://github.com/arendst/Sonoff-Tasmota/wiki/Sonoff-Pow-and-Pow-R2#push-result-using-telemetry
The process for updating the Pow R2 device is almost identical to that for the S20 smart switch and is described in detail in this video - Set Up and Configure a Sonoff S20 (1/2). To summarise:
- Solder a four pin header to the Pow R2 PCB
- Connect the header to a USB – Serial adapter, attached to your PC
- Edit the user_config.h file to update WiFi details, passwords, etc
- Flash the latest Tasmota firmware to the device
Once the device has been flashed, you should be able to connect to its web interface by pointing a browser to the device's IP address. If you defined login credentials in the firmware config, you will be prompted to enter these before the web interface opens.
Once connected, click Configuration – Configure Module. Then, from the Module Type dropdown, select Sonoff Pow R2 (43) and click Save: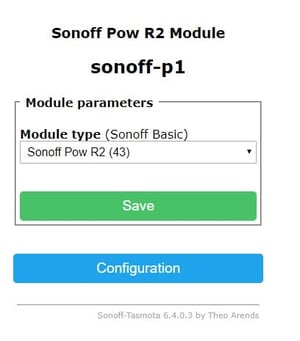
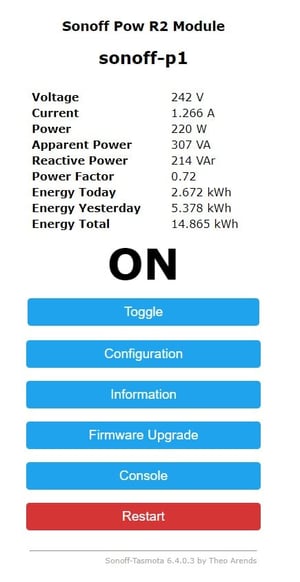
This enables the power usage telemetry on the device, and once it restarts, the data should be visible on the main menu of the web interface:
Note - After the module type is changed to Sonoff Pow R2, the serial interface is no longer available for entering commands, because it is used to communicate with the power monitoring system.
Once the switch has been flashed, you can continue to configure options such as MQTT integration for Home Assistant, as described in the S20 video. But here, we’re going to look at how to pass the power monitoring telemetry into PRTG, using the web interface provided by the Tasmota firmware.
The Tasmota Command Reference details all of the instructions and parameters that can be sent to the device. From this, we can find the format of the status command and send it to the device’s API from a browser:.jpg?width=1140&name=PRTG%20+%20Sonoff%20=%20Smart%20Meter3%20(2).jpg)
The data return is in JSON format which, when tidied up, looks like this:
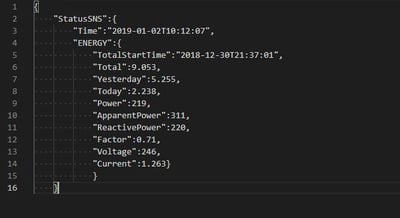
The REST Custom Sensor included with PRTG can be used to retrieve this JSON data and map the values to sensor channels. This is done by using a device template, which you can download from the template section of our GitLab site.
Simply download the template zip file and follow the instructions in the included INSTALL.md file. You can then add and configure the device in PRTG:
Add the Sonoff device, providing a meaningful name, the device’s IP address and (optionally) selecting the Sonoff logo as the device tree icon:
Next, add a REST Custom sensor to the new device, giving it a descriptive name such as Energy Usage.
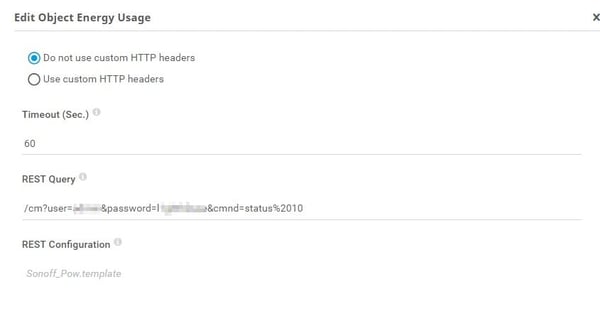
In the REST Query field, enter the query that we identified earlier:
/cm?user=cmnd=status%2010
If you defined login credentials in the device firmware config, these must be included in the query:
/cm?user=xxxxxxx&password=yyyyyyy&cmnd=status%2010
Where xxxxxxx is the username you defined in the firmware config, and yyyyyyy is the corresponding password.
In the Rest Configuration dropdown, select the Sonoff_Pow.template file.
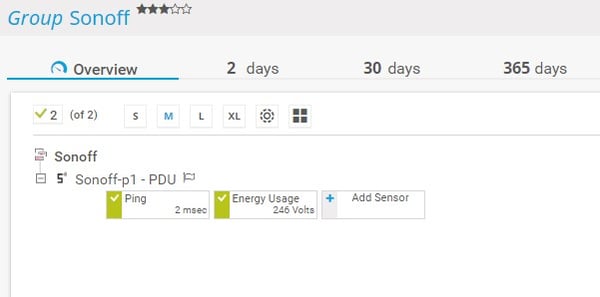
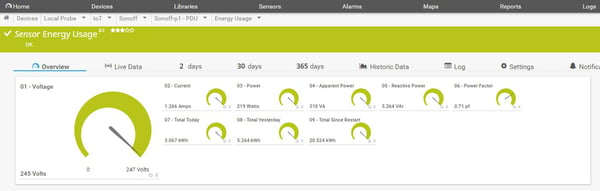
After the first sensor poll, the channels will populate and shortly after, data will be visible. You can then create limits (thresholds) and assign notifications on any of the available channels.
A cool extension to this project would be to incorporate cost details. If your energy provider publishes their price information online, you could use a custom sensor to retrieve and parse their data, and combine that with energy usage stats from The Sonoff switch, using a Sensor Factory Sensor. You could then see how much it’s costing to run your beer fridge, hair straighteners or any other piece of mission critical kit.
Update October 2020:
Ready for part 2? Click here: PRTG and Sonoff smart meter part 2 - MQTT strikes back