 Published by Nina Wooten
Last updated on March 03, 2022
•
4 minute read
Did you just receive a last-minute request for a customer call and are now frantically looking for a free meeting room? Do you spontaneously need to schedule a meeting and can’t figure out were to go? Fret no longer, PRTG has got you covered!

Our sysadmin Dieter posted a knowledge base article a while ago and you can find his script here. But, what does the script need to work and how can you make all this information visible?
iNote: The script works fine for local Microsoft Exchange environments and most Office 365 environments. For use in some specific Office 365 installations, parts of the script need to be adjusted. We are currently adapting the changes and will add the additional script as soon as we've put it through its paces!
Prepare for Monitoring
All of the meeting rooms at Paessler have their own Exchange account, which you guessed it, gives them their own calendar. If an appointment is sent to one of the rooms, and there is no other appointment “blocking” the time slot, the invite is automatically accepted, and the room is “booked”. Hence, in order to use “our” method, you would need to set up a calendar that automatically accepts/declines requests.
(As bonus information: we do the same for other resources: rentable notebooks and demo environments are just a couple more examples!)
And most importantly in this prep: Ensure that you entered the necessary credentials!
Set Up the Sensors
Once you have your calendar, you can use the PRTG EXE/Script Sensor. Of course you don’t have to use the script from my colleague Dieter (the description is currently only available in German, but we’re working on it 😊) – if you write your own script, just ensure you save it in the “Custom Sensors” folder (unsure where to find it? Check out this article).
If it does not immediately show up when trying to select a script while setting up the EXE/Script Sensor, navigate to Setup - System Administration - Administrative Tools and click “Go!” under the “Load Lookups and File Lists”. Then go back to setting up your sensor.
We set up two of these sensors per meeting room. The reason for this is to be able to display the next booking as well as the one after that. You will see why when we explain how we display the meeting room availability.
To get the availability, we use the following parameters:
-calendarmail "meetingroom@example.com"
-calendarmail "meetingroom@example.com" -next 1
Share the Availability
Once you are done with setting up the sensors for every room, you will of course now want to make this information readily available. At Paessler we use the PRTG maps feature for this purpose. The first thing we did was get our hands on floor plans where the monitored rooms are depicted. Secondly, the .zip file from the aforementioned knowledge base article also includes two custom map objects, which we use to display the availability.
In the end, putting the map together is as easy as using the floor plan as a background image for the map and then dragging the custom map objects onto the spot of the meeting room on the map. All you need to do now is drag and drop the corresponding sensor onto the custom map object and your final result will probably look similar to this:
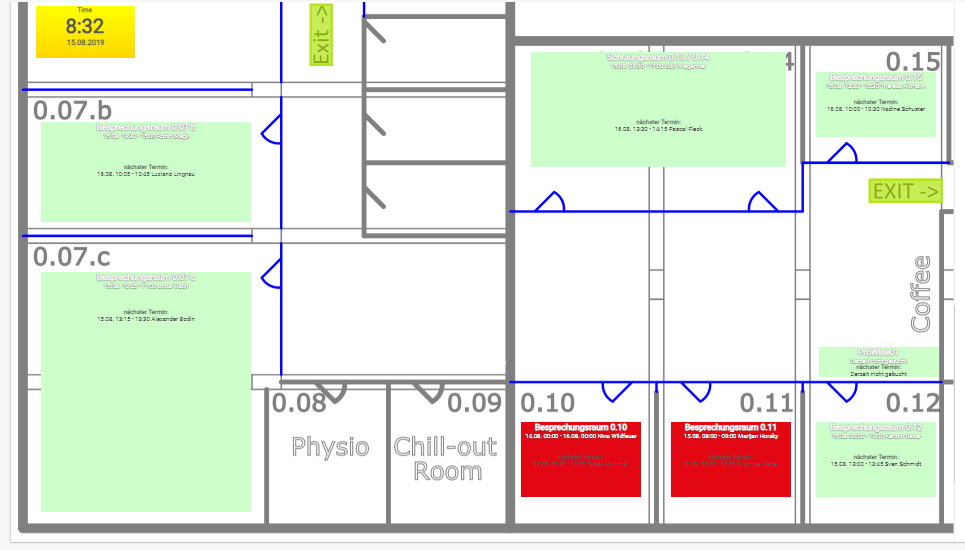
Now you can also see why we use two sensors per meeting room: it enables us to give a “preview” of the availability.
If you want, feel free to share your own scripts with us! Tell us, how did you manage to display the availability of meeting rooms in your office?
If there are any questions remaining on how we cleverly solved the issue of locating the next free meeting room, feel free to reach out to us anytime!