 Published by Shaun Behrens
Last updated on July 10, 2026
•
12 minute read
Here's the thing. PRTG Network Monitor gets used in all kinds of environments. Small businesses with maybe a dozen devices. Massive enterprises with offices on three continents. Everything in between.

But here's what keeps IT admins up at night: when you're dealing with hundreds of remote sites, adding devices one by one isn't just tedious. It's absolutely soul crushing.
I've talked to admins who spent entire weekends clicking through device creation wizards. One guy told me he added 300 devices manually over a long weekend. Not fun. And definitely not something you want to repeat.
So if you're staring down a spreadsheet with hundreds of devices that need to be added to your PRTG installation, you're probably thinking there's got to be a better way, right?
Good news. There is. Actually, there are three ways, and I'm going to show you all of them.

What You'll Learn in This Guide
In this article, I'll walk you through three proven methods to bulk add devices to PRTG without losing your mind:
-
Auto-discovery: PRTG's built-in network scanning that automatically finds and adds multiple devices
-
PrtgAPI with PowerShell: The power user approach for complex hierarchies and custom configurations
-
Direct PRTG API calls: For those who want maximum control or need to integrate with existing systems
Whether you're monitoring 50 devices or 5,000, these methods will save you hours. Maybe even days. Let's get into it.
Method 1: Using PRTG Auto-Discovery to Add Multiple Devices
Here's where most people should start. PRTG's auto-discovery feature is surprisingly powerful. Honestly, it handles about 80% of bulk device scenarios without breaking a sweat.
How Auto-Discovery Actually Works
The auto-discovery process runs in three stages, and it's pretty clever:
-
Network scanning: PRTG scans your defined IP address range using ping to find active devices
-
Device assessment: Once devices respond, PRTG figures out what they are using SNMP, WMI, and other protocols
-
Automatic sensor creation: Based on what it finds, PRTG creates appropriate sensors using built-in device templates
What I really like about this approach is that it's not just finding devices. It's actually setting them up for monitoring automatically. PRTG can scan up to 65,536 IP addresses in a single auto-discovery run. That should cover most network segments unless you're running something truly massive.
Setting Up Auto-Discovery for Bulk Import
Here's the step-by-step process:
-
Navigate to Devices > Add Auto-Discovery Group from the main menu
-
Define your IP address range (you can specify individual IPs or entire subnets)
-
Choose your discovery level:
-
Standard: Creates basic sensors for most devices (this is what I recommend for most setups)
-
Detailed: Adds every possible sensor PRTG can create (be careful here because you might end up with way more sensors than you actually need)
-
Custom templates: Pick specific device templates if you know exactly what you're monitoring
-
-
Set your schedule: Once, Hourly, Daily, or Weekly
Pro tip: For your initial bulk import, use "Once" to avoid performance issues. You can always switch to scheduled discovery later once everything's running smoothly. Trust me on this one.
For complete instructions, check out the PRTG auto-discovery manual or visit kb.paessler.com for troubleshooting tips.
When Auto-Discovery Works Best
This method really shines when:
-
Devices are on the same network as your PRTG probes
-
Your network allows ping and ICMP requests
-
You're using standard equipment like Windows servers, Cisco switches, Linux boxes, FortiGate firewalls, that kind of thing
-
You want quick results without having to write any scripts
But what if you have a more complex setup? Like hundreds of remote sites with specific group hierarchies? That's where method 2 comes in, and it's a game changer.
Method 2: Bulk Add Devices Using PrtgAPI and PowerShell
Okay, this is where things get really interesting. If you need to add hundreds of devices while maintaining a specific organizational structure (think Region > State > City > Device Type), PrtgAPI is absolutely your best friend.
What is PrtgAPI?
PrtgAPI is a C# and PowerShell library created by a PRTG user. Big shoutout to LordMilko for building this. It's not officially part of Paessler PRTG, but it's become the go-to tool for advanced automation in the community.
Disclaimer: PrtgAPI is developed independently from Paessler. While it's widely used and incredibly reliable, it's not officially supported by Paessler. That said, I've used it on production systems without any issues whatsoever.
Getting Started with PrtgAPI
First things first, you'll need PowerShell 5.1 or later. Then install PrtgAPI like this:
Install-Module PrtgAPI
Import-Module PrtgAPI
Connect-PrtgServer yourserver.com (New-Credential username password)
Basic Bulk Device Creation
Let's say you have a CSV file with your device inventory. Here's the simplest approach to get started:
# Import your list of devices from CSV
$devices = Import-Csv 'C:\devices.csv'

# Get the target group where you want to add devices
$group = Get-Probe | Get-Group 'Remote Sites'

# Loop through and add each device
foreach($device in $devices) {
    $group | Add-Device -Name $device.Name -Host $device.IPAddress
}
Your CSV file might look something like this:
Name,IPAddress,Location
Router-NYC-01,192.168.1.1,New York Office
Switch-NYC-02,192.168.1.2,New York Office
Server-LA-01,10.0.1.10,Los Angeles DC
Pretty simple, right? But here's where PrtgAPI really shines and saves you massive amounts of time.
Advanced: Creating Group Hierarchies Automatically
Imagine you need to import devices across multiple regions. Each region has its own states and sites. Doing this manually would take literally forever. I'm talking days of clicking. With PowerShell, you can automate the entire structure:
# Import CSV with organizational hierarchy
$inventory = Import-Csv 'C:\network-inventory.csv'

# Group by location hierarchy
$grouped = $inventory | Group-Object Region, State, Site

foreach($location in $grouped) {
    # Create region group if it doesn't exist
    $region = Get-Probe | Get-Group $location.Region -ErrorAction SilentlyContinue
    if(!$region) {
        $region = Get-Probe | Add-Group $location.Region
    }

    # Add devices to the appropriate location
    foreach($device in $location.Group) {
        $region | Add-Device -Name $device.DeviceName -Host $device.IPAddress
    }
}
This script creates your entire organizational structure on the fly. I've personally seen this approach used to add over 500 devices across 50+ locations in under an hour. Try doing that manually and you'll be there until next Tuesday.
Handling Credentials and Device Templates
One thing that trips people up all the time: credentials. Here's a huge time saver. Set credentials at the group level in PRTG, and all child devices inherit them automatically. You can configure this in the root group settings before running your bulk import.
You can also apply device templates during the import process. This ensures consistent sensor configurations across all your new devices, which is exactly what you want.
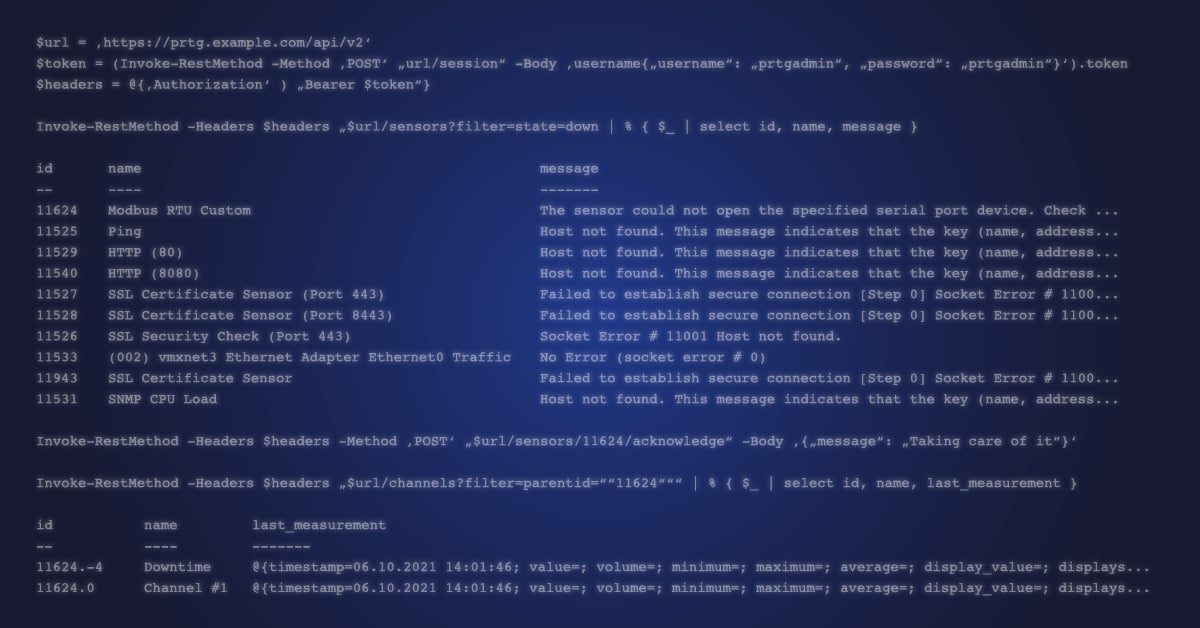
Method 3: Direct PRTG API for Custom Integration
Not a PowerShell person? Or maybe you need to integrate device creation with your existing IT infrastructure management tools? The PRTG API gives you direct HTTP-based access to everything.
Basic API Call Structure
Here's what a device creation call looks like:
https://yourserver/api/duplicateobject.htm?id=GROUP_ID&name=NEW_DEVICE_NAME&host=IP_ADDRESS&username=USER&passhash=HASH
You can script these calls using Python, bash, or any language that can make HTTP requests. This is particularly useful if you're pulling device information from a CMDB or asset management system and want to keep everything synchronized.
For detailed API documentation, visit the PRTG API reference. It's pretty comprehensive.
Best Practices for Bulk Adding Devices
After helping dozens of organizations with bulk imports, here's what actually works in the real world:
1. Prepare Your Data First
Seriously, don't skip this step. I know it's tempting to just dive in, but trust me. Create a clean CSV or Excel file with:
-
Device names (use consistent naming conventions, please)
-
IP addresses or DNS names
-
Locations
-
Device types
-
Any custom properties you need
Verify that all IP addresses are actually reachable before you start the import. Nothing's more frustrating than importing 200 devices only to find half of them have typos in the hostname. Been there, done that, got the t-shirt.
2. Use Multi-Edit for Bulk Changes
PRTG's multi-edit feature is seriously underrated. After importing devices, you can select multiple objects (just hold Ctrl), right-click, and edit settings for all of them at once. This is perfect for applying notifications, adjusting scanning intervals, or updating credentials across existing devices.
It's one of those features that once you start using it, you wonder how you ever lived without it.
3. Schedule Auto-Discovery Wisely
For dynamic environments, weekly auto-discovery makes sense. But hourly? That's overkill for most networks and can really impact performance. Start with "Once" for your initial bulk import. Verify everything looks good. Then switch to a scheduled discovery if you actually need it.
4. Leverage Remote Probes
If you're monitoring distributed locations, set up remote probes at each major site before bulk adding devices. This improves monitoring accuracy and reduces network traffic significantly. It's worth the extra setup time upfront.
5. Monitor Performance During Import
Large auto-discoveries can be pretty resource intensive. If you're adding 1000+ devices, you should consider:
-
Running imports during off-peak hours (like weekends or late at night)
-
Adding devices in batches of 100 to 200 instead of all at once
-
Monitoring your PRTG server's CPU and memory usage while the import runs
I learned this the hard way when I crashed a production PRTG server by trying to import 2000 devices at 2pm on a Tuesday. Don't be like me.
Troubleshooting Common Issues
Devices not discovered? First thing to check: firewalls. Make sure they allow ICMP (ping) requests. Also verify that SNMP is actually enabled on target devices and that credentials are properly inherited from parent groups. Nine times out of ten, it's one of these three things.
PrtgAPI connection errors?
Confirm the PRTG API is enabled in "System Administration" sttings. Also check that your passhash is current. Sometimes you need to regenerate it, especially if you recently changed your password.
Performance degradation? Reduce your auto-discovery scope to smaller IP ranges. You can also pause non-critical sensors during bulk operations. Your PRTG server will thank you.
Which Method Should You Choose?
Here's a quick comparison to help you decide:
MethodBest ForTechnical SkillSetup TimeAuto-DiscoveryStandard networks, quick setupBeginner5 minutesPrtgAPI + PowerShellComplex hierarchies, 100+ devicesIntermediate30 minutesDirect APICustom integrations, CMDB syncAdvanced1 to 2 hours
My recommendation? Start with auto-discovery to get familiar with how PRTG handles bulk operations. Once you understand your monitoring requirements and feel comfortable, implement PrtgAPI for ongoing bulk operations and custom workflows. That's the path most people take, and it works really well.

Ready to Scale Your PRTG Deployment?
Bulk adding devices to PRTG doesn't have to be a manual nightmare. Whether you choose auto-discovery for simplicity, PrtgAPI for power and flexibility, or direct API calls for custom integration, PRTG gives you the tools to efficiently monitor your entire IT infrastructure.
And honestly, once you get this set up, you'll wonder why you ever did it manually in the first place.
Next Steps:
-
Download the PrtgAPI library to get started with PowerShell automation
-
Review PRTG's 250+ sensor types for comprehensive monitoring
-
Explore the Knowledge Base for additional tips and tricks
Start Monitoring Hundreds of Devices Today
New to PRTG? Start your free 30-day trial to test auto-discovery with your network before committing to a license. It's the best way to see if this approach works for your specific setup.