 Published by Sascha Neumeier
Last updated on March 03, 2022
•
8 minute read
Choosing the best platform for PRTG Remote Probes isn't easy. We have spent quite some time looking for hardware that is powerful, but also cost-effective, that could be ideal for use as a PRTG Remote Probe platform. If you think the answer is always a high-spec device, you are wrong! Learn what we have found out!

At Paessler, we are constantly working to make collecting sensor data in the corporate network as easy as possible. For users of our hosted PRTG environment (my-prtg.com) or administrators who want to monitor remote locations, we provide our PRTG Remote Probe.
PRTG Remote Probe, the Busy Bee
The Remote Probe is installed on a computer in the network. It acts as a decentralized data collection point of a network segment and communicates with the PRTG Core Server. The PRTG Core Server is either an on-premise PRTG installation in the company's HQ, or a PRTG instance running in the cloud - our my-prtg.com service.
To get a feel for the Remote Probe hardware requirements, it is recommended to have a look at our System Requirements for Remote Probes.
Conclusion of the system requirements: A current PC with 2GB RAM, Windows 10, and a stable network connection is all you need. Today we look at how we can put the defined hardware requirements for the Remote Probe into practice with the least technical and financial expense.

The Early Stages
Our founder Dirk Paessler has written about different hardware configurations of Remote Probes here on the blog in the past:
- 2016: Run a PRTG Probe on a 169.90 Euro Mini-PC
- 2017: 3 Well-Tested Strategies for Remote Network Monitoring on a Budget
This showed that it is basically possible to operate a PRTG Remote Probe with a Mini-PC (or even with a tablet computer). But what does the situation look like under tough every day conditions in the corporate environment? We wanted to get to the bottom of this question and therefore started an in-depth test with an Intel Compute Stick at the beginning of February 2018.
Instead of a handful of sensors as in Dirk's first tests, we integrated the Remote Probe installed on the Intel Compute Stick into a production environment and equipped it with more than 1,600 sensors. But first things first...
Hardware and Setup
We invested almost 130 US dollars in the hardware and ordered an Intel Compute Stick at a large online retailer.
| Type | Intel Compute Stick |
| Model | STK1AW32SC |
| CPU | Intel Atom x5-Z8330 1.44GHz |
| Memory | 2GB |
| Hard disk | 32GB eMMC |
| Network Adapter | Intel Dual Band Wireless-AC 7265 |
| Operating System | Windows 10 Home |
| Price | USD 129 |
After the parcel delivery man dropped off the Stick-PC, we immediately started installing and setting up the PRTG Remote Probe. Since some settings still have to be made on the PRTG Core Server in advance, we have described all the steps for preparing and performing the installation in our manual.
Equipping Sensors and Test Phases
To make the test phase as genuine as possible, it was important for us to simulate a realistic use case. Therefore, we implemented the Remote Probe in our production environment and stocked it with a lot of sensors. The continuous monitoring of a partial infrastructure including switches, servers, storage, telephony and our environmental monitoring covers more than 1,600 sensors. The scanning interval is 60 seconds on average, so the Remote Probe is supplied with sensor data approximately 2.4 million times (!) per day.

Let Us Have a Look at the Results
While the first 30 days of the test were mainly used to evaluate initial short-term feedback and test the remote sample under extreme loads, the focus of the second half of the test period (March - April 2018) was on simulating conditions as close to reality as possible. In the last 30 days, the Remote Probe silently performed its service and did what it was ordered for - collecting sensor data and communicating with the PRTG Core Server.
Let's look at the Probe Health of the Remote Probe at 30-day intervals.
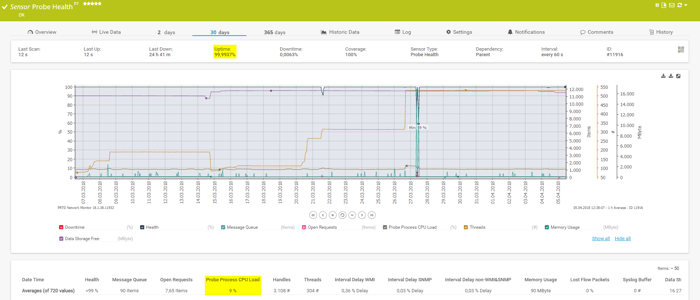
The 30-day overview shows that there is absolutely no reason for complaint. The Remote Probe runs reliably, and the available performance is more than sufficient. The hardware is always far from its limitations.
An overview of the most important performance indicators:
| Average CPU Load | 9% |
| Uptime (30 days) | 99,9937% |
| WMI Interval Delay | 0,36% |
| SNMP Interval Delay | 0,03% |
| Average Memory Usage | 90MB |
Simulating a Realistic Hands-On Scenario
The test results show that a Stick-PC with the chosen hardware equipment is sufficient for the operation of complex remote probes. However, in practice there are quite different requirements for you as admins - for example an uncomplicated deployment and an unattended, resource-saving operation of the Remote Probe.
We wanted to test and simulate that scenario as realistic as possible. So let's take a closer look at the hands-on:
Assumed initial situation: The IT department is located at the company's headquarters, and so is the PRTG Core Server. Now it is planned to monitor additional company locations using PRTG Remote Probes. The PRTG administrator may not visit all locations to set up the remote probes, and there is no local IT know-how at the branch-offices.
Solution: Setup and configure the stick PC at headquarters and dispatch to the branch office, with a fully automatic start-up on site.
Approach:
- Ordering hardware (yes, it all starts here) 😉
- Preparing the Windows environment
- Installing the PRTG Remote Probe Software
- Configuring the WLAN connection for DHCP use
- Manually adding the WLAN information of the branch location: SSID + Key and ticking the box "Connect automatically”
- Configuring Windows auto logon
- Configuring Windows Automatic Updates
- Deactivating all standby and sleep modes
- Heading to the post office!
After that, inform somebody at the branch office to unpack the incoming parcel then connect the stick PC to the mains at a location with WLAN reception and press the power button.
That’s All!
No keyboard or mouse is required, no display needs to be connected. The PC starts, logs on to Windows, connects to the WLAN that has already been set up in the headquarters, starts the Remote Probe Service, logs on to its PRTG Core Server, and begins collecting the sensor data. Future software updates of the Remote Probe can also be initiated directly via the PRTG Core Server.
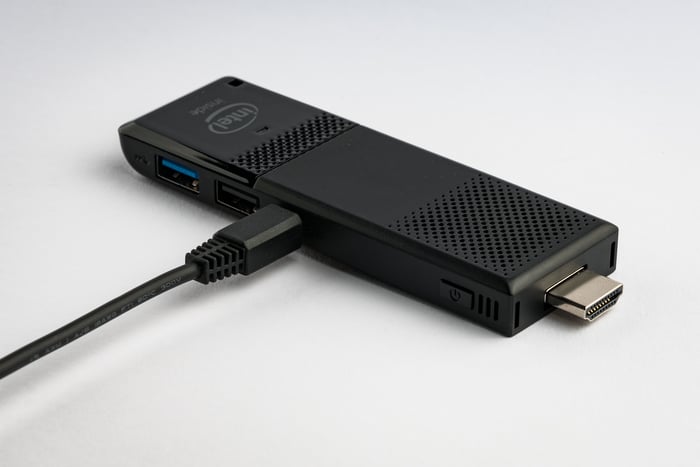
The hardware setup in the branch office will look about as simple as shown in the following picture:
Our Recommendation
The Intel Compute Stick used in our test is currently (04/2018) still available in this configuration in stores. You can find more information directly at Intel.
We can recommend the tested configuration without reservation - the hardware of other manufacturers with comparable performance data will probably perform just as well.
As this is all about hardware, and we are a software company, we have to refer to our disclaimer:
Please note: We have carefully compiled this information and it is provided to the best of our knowledge. As the solution is not part of PRTG itself, it is not officially supported by PRTG Technical Support. Yet, we wanted to share it with you as it might be of interest for many PRTG users.
Your Experience and Feedback
This means that even pure Linux system environments can be equipped with a Windows-based PRTG Remote Probe without disrupting complete IT strategies.
We hope this showed you another alternative for how a Remote Probe scenario can be implemented with little effort and low costs.
What are your experiences with Remote Probe Hardware? Do you use older computers to run the PRTG Remote Probe, or even tablets? What are your experiences with headless operation (i.e. without connected input and output devices such as keyboard, mouse or screen)? We will be more than happy if you share your experiences with us in the comments!