 Published by Benjamin Day
Last updated on January 23, 2024
•
10 minute read
Check Point Software has been in business since 1993, and they presently have a large coverage of IT security devices and services they offer for all business verticals. I’d like to discuss some of the key performance indicators on these devices, and how to go about adding them to your PRTG monitoring solution to assure their availability and performance.
Check Point offers both hardware appliances, and virtual appliances.This article will focus more on the hardware appliances.There are some key performance indicators that are only applicable to the hardware appliance. These are mainly dealing with fans, temperature, voltage, and power supplies. The virtual appliance does not include these counters, as they should be monitored through the embedded management for your hypervisor host.
iVirtualization is the process of creating a virtual version of something like computer hardware. It involves using specialized software to create a virtual or software-created version of a computing resource rather than the actual version of the same resource. Read more ...
The Basics
The great thing about Check Point devices is they are all based on Linux. Which means they support the standard SNMP CPU, memory, and disk sensors that PRTG already has out of the box.
iSNMP stands for Simple Network Monitoring Protocol. Its usefulness in network administration comes from the fact that it allows information to be collected about network-connected devices in a standardized way across a large variety of hardware and software types. SNMP is a protocol for management information transfer in networks, for use in LANs especially, depending on the chosen version. Read more ...
To enable SNMP on the Check Point device, start in the webGUI. Navigate to the System Management section and click on SNMP.
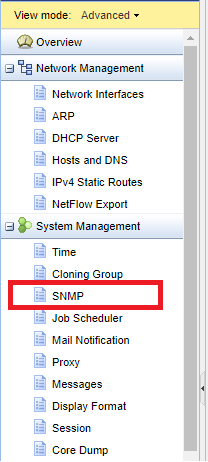
Now, you can enable the SNMP Agent, choose your version, fill in the location and contact string, select which interfaces will allow SNMP to traverse them, set your community strings, and finally configure SNMPv3 authentication settings.
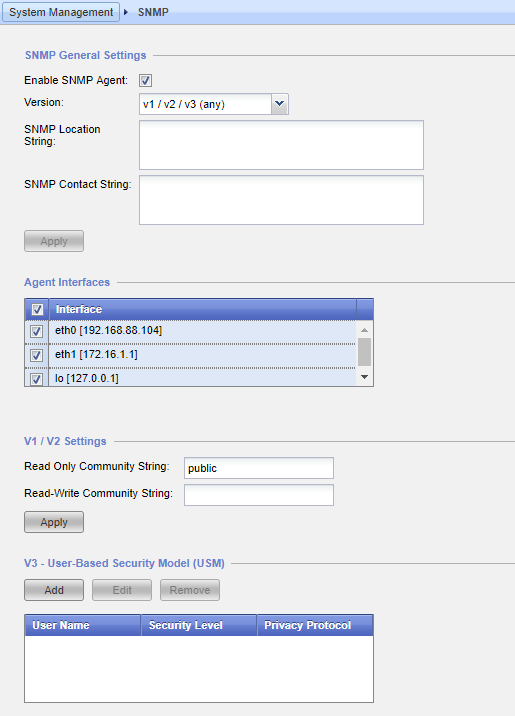
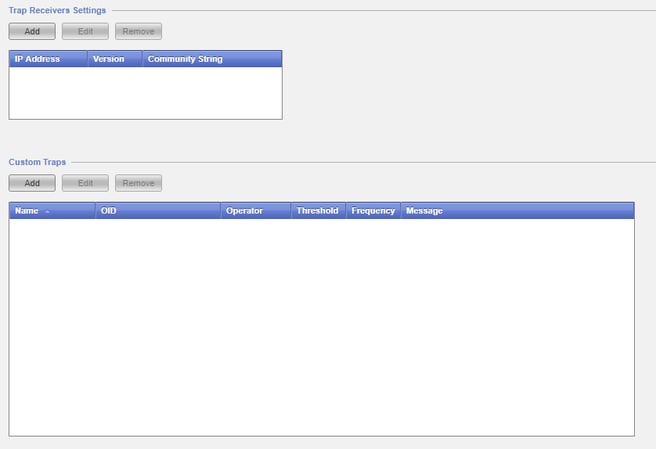
You can also enable SNMP traps here if you wish to setup an SNMP trap receiver sensor for your Check Point device. Here you can setup your PRTG server as the trap receiver, and if you would like to configure any custom trap messages. These are not required, as the regular trap messages are just fine.
PRTG Sensors for Check Point
Now that we have SNMP enabled on our device, let’s talk about sensor strategy. As we mentioned before, the following sensors in PRTG will work for your Check Point device and return the following telemetry.
| Type | Comments |
| SNMP CPU Load | Total CPU usage and core/ thread usage |
| SNMP Linux Meminfo | Percentages and numeric values of your physical, swap, and total free memory |
| SNMP Disk Free | Percentage and numeric value of available space on various disks |
| SNMP Traffic | Bandwith utilization for all Ethernet ports on your device |
| SSL Security Check* | Gives a posture check of your device from an SSL perspective |
| SSl Certificate* | Shows you all available data about any SSL certificate applied to the device |
*Only applicable if you are using the IPSec VPN function of the Check Point
Useful Check Point OIDs
When it comes to the MIB that Check Point provides, it contains over 1,200 OIDs that PRTG can work with. Deciphering these OIDs can be a nightmare. That’s what we are here to help with! The following table contains OIDs that we have found the most useful when working with a Check Point device. The OIDs vary from integer values, tables, strings, and IP addresses.
iAn IP address (internet protocol address) is a numerical representation that uniquely identifies a specific interface on the network. IP addresses are binary numbers but are typically expressed in decimal form (IPv4) or hexadecimal form (IPv6) to make reading and using them easier for humans. Read more ...
We have created a Check Point device template that will give you all the basic metrics you need for your device.
| Category | OID | Type | Comments |
| RAID | .1.3.6.1.4.1.2620.1.6.7.7.2.1.9 | Integer | RAID disk status |
| RAID | .1.3.6.1.4.1.2620.1.6.7.7.2 | Table | RAID storage status |
| RAID | .1.3.6.1.4.1.2620.1.6.7.7.1 | Table | Logical RAID storage status |
| Power Supply | .1.3.6.1.4.1.2620.1.6.7.9 | Table | Power supply status |
| Fans | .1.3.6.1.4.1.2620.1.6.7.8.2 | Table | Fan status |
| Temperature | 1.3.6.1.4.1.2620.1.6.7.8.1 | Table | Temperature status |
| OS | .1.3.6.1.4.1.2620.1.1.22 | Integer | Major version number |
| OS | .1.3.6.1.4.1.2620.1.1.23 | Integer | Minor version number |
| Cluster | 1.3.6.1.4.1.2620.1.5.101 | Integer* | Cluster status code |
| Cluster | .1.3.6.1.4.1.2620.1.5.12 | Table | Cluster interface and states |
| VSX | .1.3.6.1.4.1.2620.1.16.23.1 | Table | VS statistics table |
| VSX | .1.3.6.1.4.1.2620.1.16.22.1 | Table | VS status table |
| VPN | .1.3.6.1.4.1.2620.1.2.5.4.5 | Integer | Encrypted packets/second |
| VPN | .1.3.6.1.4.1.2620.1.2.5.4.6 | Integer | Decrypted packets/second |
| VPN | .1.3.6.1.4.1.2620.500.9002.1.1 | IP Addr | VPN peer IP address |
| VPN | .1.3.6.1.4.1.2620.500.9002.1.2 | String | VPN peer name |
| VPN | .1.3.6.1.4.1.2620.500.9002.1.3 | Integer* | VPN peer tunnel state |
Please see this Knowledge Base article on "Monitoring Check Point Firewalls" for a detailed guide and a link to the template. You can also find the "PRTG Template for Checkpoint NG Firewall" directly on GitHub.
Final Thoughts
Check Point devices are complex, and can serve many functions in your IT infrastructure. But with the help of this guide, you can see that the important telemetry can be narrowed down quite a bit. It will always come down to how the device fits into your network. Feel free to check our Sensor Hub and our GitHub repository for device templates and other helpful files for many other hardware vendors!